WMC help
The automatic MUD map: reading, editing and walking routes
Wandur draws a map of each world as you play. This page explains where the map's data comes from, how to read it, and how to search it, correct it, plan routes on it and move maps between computers.
How the map builds itself
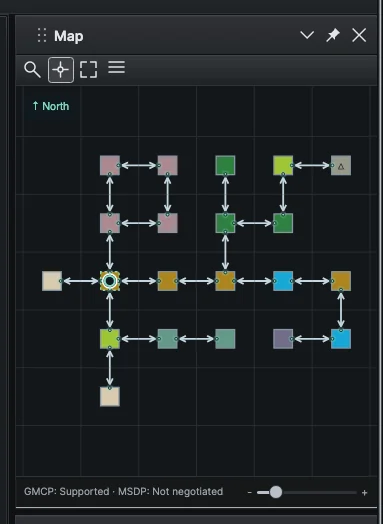
The map lives in the Map Panel on the right side of the window. If you closed it, turn it back on from View → Map Panel. It always shows the map of the session you are looking at.
Most of the map's data comes from structured room data that many worlds send alongside the text:
- GMCP (Generic MUD Communication Protocol) carries small JSON messages, such as the room you are in, its exits and its area.
- MSDP (MUD Server Data Protocol) carries similar data as named variables.
When a world sends a room ID, Wandur knows exactly which room you are in, and every move you make adds a connection between two rooms. Connections are directed: walking south from A to B records A to B only. Walk back once and the return connection is added too. If a teleport or a moving vehicle changes your room without a direction command, your position updates but no connection is drawn.
Worlds that send no room data
When a world sends no structured room data, Wandur reads room blocks in the text instead. It looks for an English room layout: a title line, a description, and an exits line that starts with Exits: or Obvious exits:. Rooms found this way are matched by name, description and exits, so similar rooms can stay uncertain, and the map marks the layout as inferred. As soon as a world sends structured room data during a connection, Wandur stops reading room text for that connection.
To see what a world sends, open Map tools (the ☰ button on the map toolbar). The status line reads GMCP: … · MSDP: …, where each protocol is Supported, Declined or Not negotiated. Below it, Room fields received lists the fields that actually arrived: ID, name, description, exits, area, terrain, coordinates or symbol. The same details appear when you hover over the status bar under the map. Room data often arrives only after you log in, or after you move or look. For the raw messages, see Health, mana and resource bars, which covers the Diagnostics view.
Reading the map
North is up. A dot marks your position, a white outline marks the selected room, and dashed lines mark inferred connections or uncertain rooms. A one-way exit has a single arrow, and door marks show open, closed and locked exits. Small lights on a room's edges show exits Wandur knows about, including ones that lead somewhere you have not mapped yet. Hover over a room to see its name, terrain, coordinates and notes.
Terrain colors
Rooms are colored by terrain when the world reports it or when you set it yourself:
| Terrain | Color |
|---|---|
| Unknown | Gray |
| Indoors | Pale tan |
| Settlement | Dusty rose |
| Road | Ochre |
| Grassland | Light green |
| Forest | Dark green |
| Desert / sand | Sand yellow |
| Mountain / hills | Gray green, with a △ symbol |
| Cave | Gray violet |
| Water | Bright blue |
| Underwater | Deep blue |
| Swamp | Teal green |
| Snow / ice | Pale blue |
| Spacecraft | Slate |
For worlds that report no terrain, Wandur can guess it from each room's name and description with a small model that runs on your computer. Open Map tools → Room terrain inference, choose Download model (an 80 MB download) or Install from file, and keep Color rooms with the local model checked. A guessed terrain is labeled "inferred" with its confidence in the tooltip. Terrain from the world, or set by you, always wins over a guess, and room text never leaves your computer.
Areas, floors and grid mode
In Map tools, the Area list chooses which area to show, and the arrows beside the floor label move up or down a floor. You can also click the ↑ and ↓ badges on a room to look at the floor an exit leads to. This only changes the view; it never sends a command to the world.
Contiguous grid draws the current area as touching tiles filled with terrain colors, which suits worlds laid out on a grid. Wandur saves this choice for each area. Touching tiles do not mean there is an exit between them.
Following your position, panning and zooming
The toolbar above the map has four buttons: search, Keep current room centered, Fit floor and Map tools. Keep current room centered is on by default and moves the view to your room each time you arrive somewhere new. Fit floor fits the whole floor into the panel.
- Drag the map to pan.
- Scroll, pinch on a trackpad or touchscreen, or use the Zoom slider in the status bar under the map.
If the map loses track of you, open Map tools and choose Recheck position. Wandur keeps the map and uses your next room observations to find you again.
Searching rooms
Click the magnifier on the map toolbar and type in Search rooms.... The search matches the names and descriptions of rooms you have seen. Every word must match, and you can put a phrase in quotes. Matching rooms are highlighted, the rest are dimmed, and a count appears under the box. Press Enter or the Next match arrow to step through matches, switching floors as needed. Matches on other floors are also listed under On other floors. Escape clears the search. Searching never sends anything to the world.
Planning and walking a route
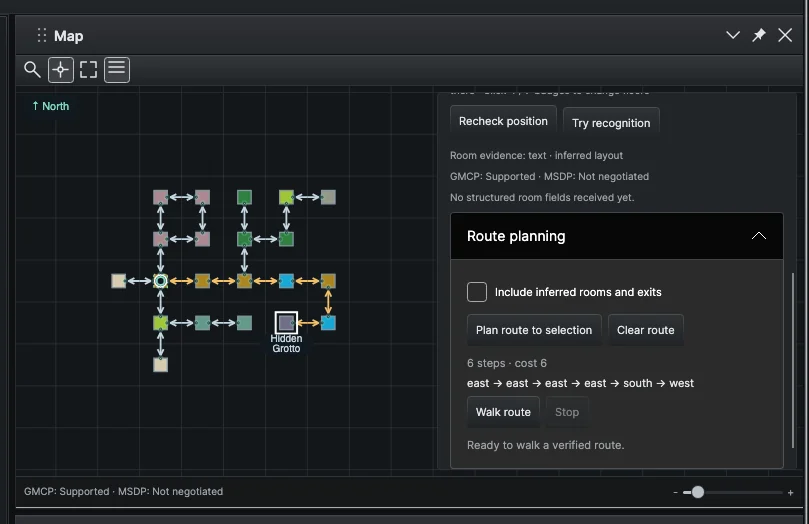
The quickest way to travel is to double-click a room. Wandur plans a route from your current room and walks it, one step at a time. A Stop button appears on the map toolbar while you walk.
For more control, select a destination and open Map tools → Route planning:
- Choose Plan route to selection to see the commands, the number of steps and the total cost.
- Check Include inferred rooms and exits if you want guessed connections considered.
- Choose Walk route to start, or Clear route to discard it.
Walking needs a connected session and confirmed server room IDs along the whole route, so it works only on worlds that send room IDs. Wandur sends one direction, waits for the expected room, then sends the next. It stops if you arrive somewhere unexpected, a move is blocked, the next room takes too long, you send another command, turn on private input, disconnect, or the map changes. A command already sent cannot be taken back. Routes avoid closed and locked doors and anything you excluded. Automatic walking sends direction commands only; follow custom exit commands yourself.
Editing the map
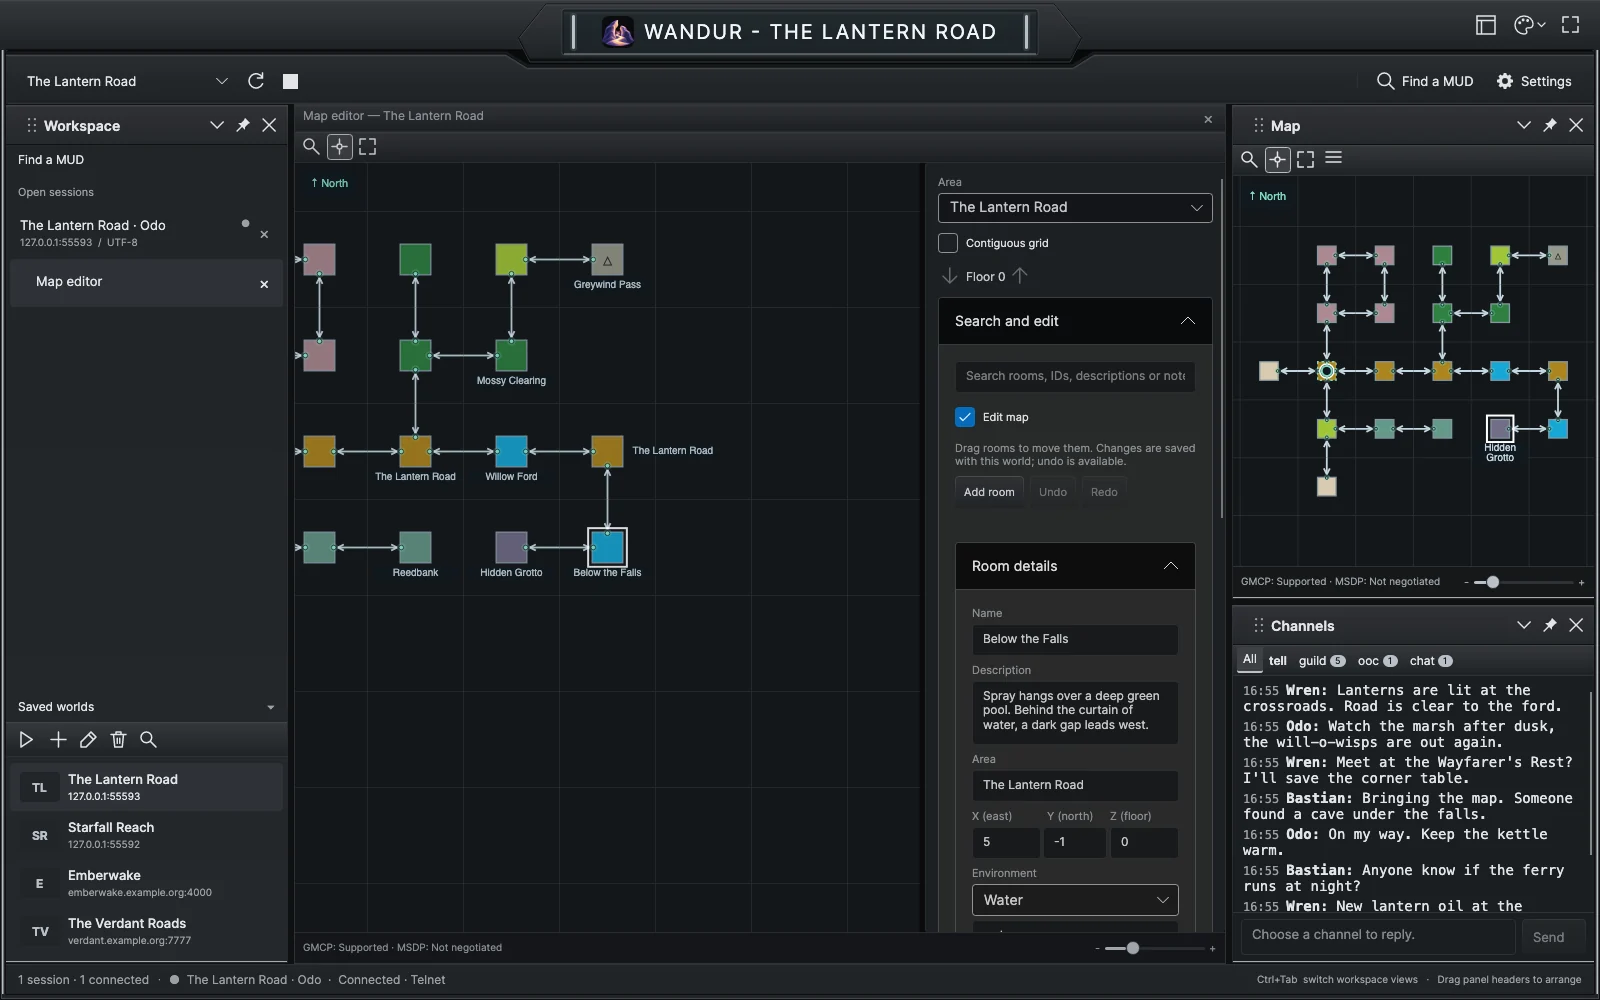
Open Map tools → Open map editor…. The editor opens in the center of the window beside your session, with its own map and an inspector on the right. It is listed under the session in the Workspace panel; right-click it there and choose Open in separate window to give it its own window. You can keep editing after a session disconnects. Closing the session closes its editor.
In the editor:
- Edit map is on, so you can drag rooms to new positions. Double-click walking is off while Edit map is on.
- Search and edit searches room names, descriptions, notes and IDs. Choosing a result jumps to its area and floor.
- Add room creates a new room. Undo and Redo cover your last 50 map changes, including imports.
- Room details edits the selected room: Name, Description, Area, coordinates (X east, Y north, Z floor), Environment (terrain), Custom color (#RRGGBB, optional), Symbol, Notes, Room traversal cost and Exclude room from routes. Choose Save room, Delete room or Set current position here. To clean up a duplicate, pick it in Duplicate to merge into and choose Merge into selected destination.
- Directed exits edits one exit at a time: its direction, Destination room, Command (blank uses direction), Exit cost (0 uses destination cost), Door state and Exclude exit from routes. A return exit is added only if you check Also create a return exit. Choose Save exit or Delete exit.
Your corrections are kept when you revisit those rooms later.
Importing and exporting maps
In the editor, Export map… saves the world's map as a Wandur map file in JSON format, and Import map… loads one, replacing the current map for that world. Imports are checked before anything is replaced and can be undone. After an import, Wandur no longer knows where you stand, so let it find you again before walking. A map file can be up to 16 MiB with up to 10,000 rooms and 60,000 exits. This is Wandur's own format; it does not read Mudlet map files.
Where maps are stored
Each world's map is saved automatically in Wandur's local database, wandur.db, in the app's data folder:
| System | Folder |
|---|---|
| macOS | ~/Library/Application Support/Wandur |
| Windows | %APPDATA%\Wandur |
| Linux | ~/.config/Wandur |
Maps belong to the world, so every session on the same world shares one map. Copying wandur.db while Wandur is running may not give you a complete copy. To back up or move a single map, use Export map….